Open Water Guide to Event Operations
Creating and Running an Open Water Event
Starting a new open water event can seem like a daunting and overwhelming undertaking. If you’ve participated in an open water swim before, you’ve seen the amount of work that goes into having a safe, fun, and successful event.
Don’t let all those tasks and concerns that you’re thinking about right now deter you from starting a new event. They can all be managed and worked through by starting with and using an action item to-do list of tasks and then work through them one at a time.
The following lists of tasks are designed to walk you through the process from start to finish. Depending on your event, not all of these tasks may apply. The goal here is to help you get started and then follow the essential steps needed to host a great open water event.
Open Water Event Steps and Checklists
View a printable version here.Step 1: Selecting a Venue and Creating Preliminary Plans
Selecting the right venue is probably the most important decision that event organizers make relating to safety, event success, and swimmer satisfaction. Before working on items such as logo designs and T-shirts, you need to know where the event is going to take place and understand all of the rules and requirements around using the venue for a swimming event. Without permission and understanding of what you can and can’t do at the venue, you shouldn’t spend too much time on other aspects of the event.
If you’re thinking about running an event, you probably already have a venue in mind, such as a lake, ocean, bay, or river.
- Visit the venue and get an idea where the start and finish line will be. Determine if the water fluctuates drastically during the year (tides, rainfall amounts, etc.), which would impact water quality, water levels, currents, etc., because this may change how the course is set up. What are the typical water temperatures (Rule 302.2.2 A) for the time of year you want to host the event?
- What are the typical weather conditions for the time of year you want to host the event?
- How many participants do you want in the event and can the venue handle that number? Think about safety aspects of the venue based on the number of participants.
- Is there enough parking? Will you use a shuttle system?
- Are there fees for accessing the venue? If so, will those be paid by the participants upon arrival or as part of their event entry fee?
- Are there bathrooms, picnic tables, or buildings that can be used for the event?
- Based on the body of water configuration, decide what the course will look like, course distances, buoy positioning, and safety concerns.
- Are there any hazards on the course such as downed trees, docks, channel markers, marina where boat traffic could be heavy, etc.? If there are hazards on the course, devise a plan to either remove them or work around them in a safe manner. If it’s near a marina, speak to the owners of the marina letting them know what you’re doing and when. Ask them if you can post signs letting boaters know that an event is taking place.
- Develop a preliminary venue map showing your initial ideas about how you will run your event. This includes showing registration, bathrooms, medical services, awards, start and finish lines, and parking areas.
- Develop a preliminary event plan along with a race day timeline.
- Using USMS safety guidelines and the USMS rule book, write a safety plan with detailed information about how you plan to ensure safety with safety boats, kayakers, lifeguards, buoys on the course, EMTs, volunteers, etc. Does the venue already have lifeguards who could work the event?
- Is the venue a local, regional, or county park or is it governed by the U.S. Forest Service or the local municipality? Wherever it is, schedule a meeting with the organization that oversees the venue area and present your event and safety plans, map, and ideas. The organization will likely give feedback on what it requires, and your preliminary plans may change. It may also require you to secure a permit and pay fees. Discuss potential dates that the venue could be reserved.
Step 2: Sanctioning, Course Map, and Safety Planning
- Contact your LMSC (Local Masters Swimming Committee) sanctions chair to discuss your plans and dates for your event.
- Discuss in detail what is needed for sanctioning approval and open dates that do not conflict with other local or regional USMS events.
- Pick a race date based on your meeting with venue officials, your LMSC, other local events in the area, weather, water temperatures, and anything else that may affect your event.
- As soon as possible, call or meet with the local venue organization to let it know what date you selected for your event. You may have to pay a fee to secure your date and reserve/rent the venue. You may also have to fill out paperwork to discuss how the event will run, including safety protocols and medical and police presence.
- Finalize the venue map showing where parking, registration/check-in, the start and finish lines, bathrooms, hospitality, and awards are located. Make this map available to participants.
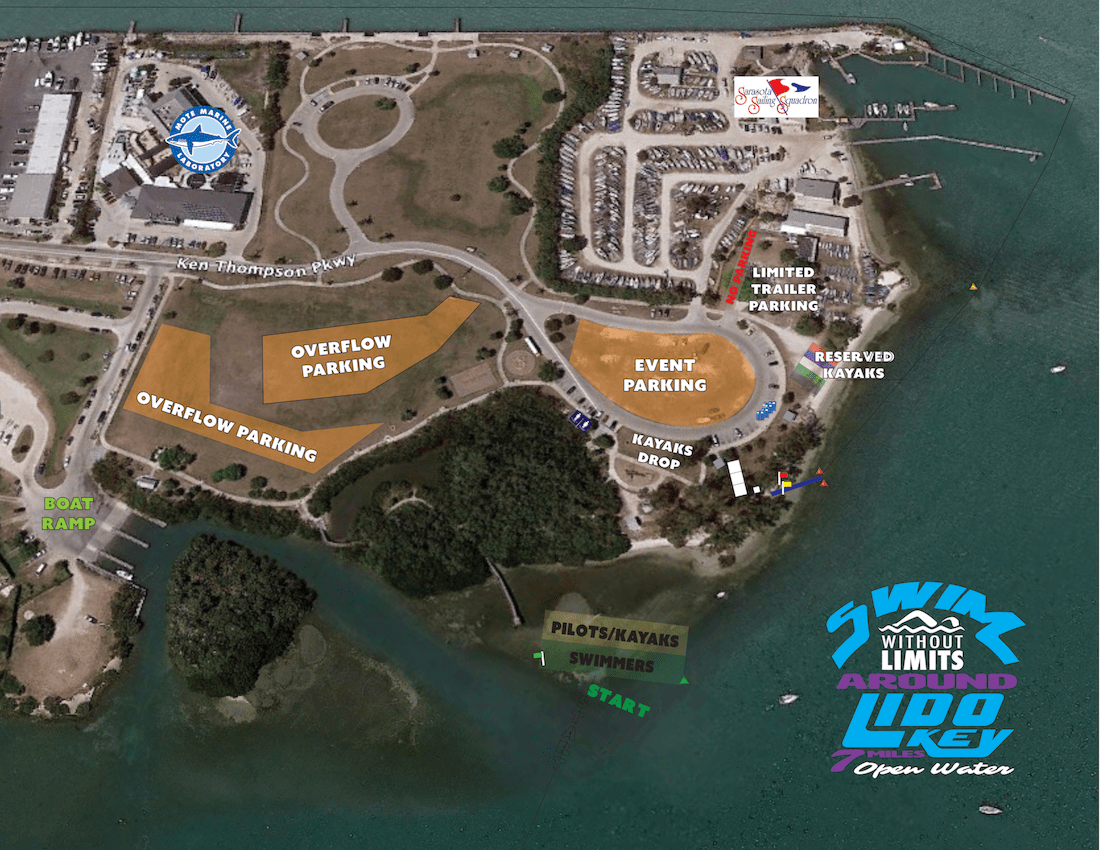
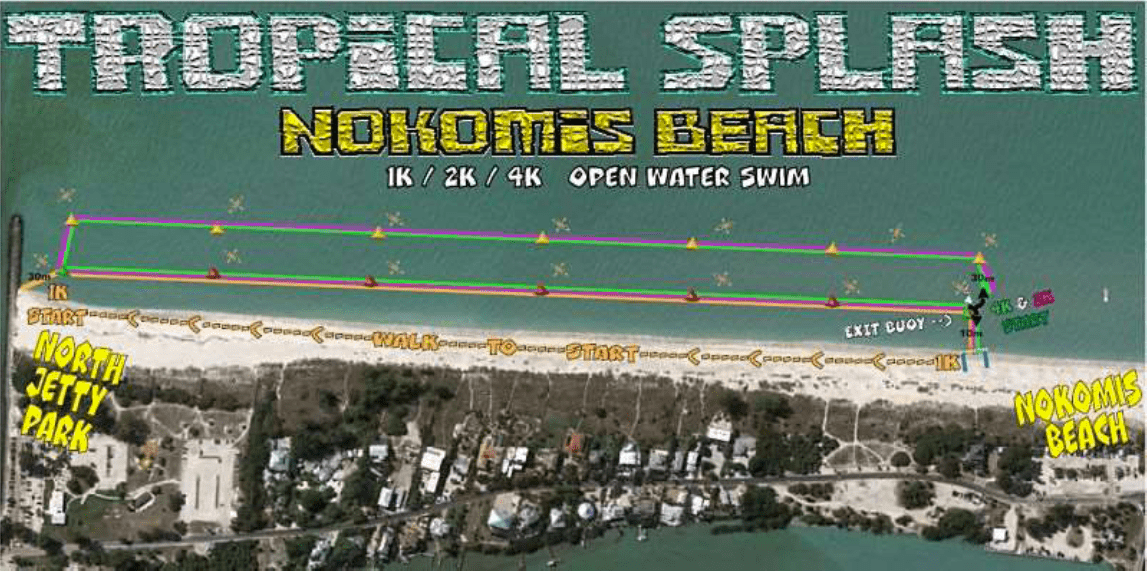
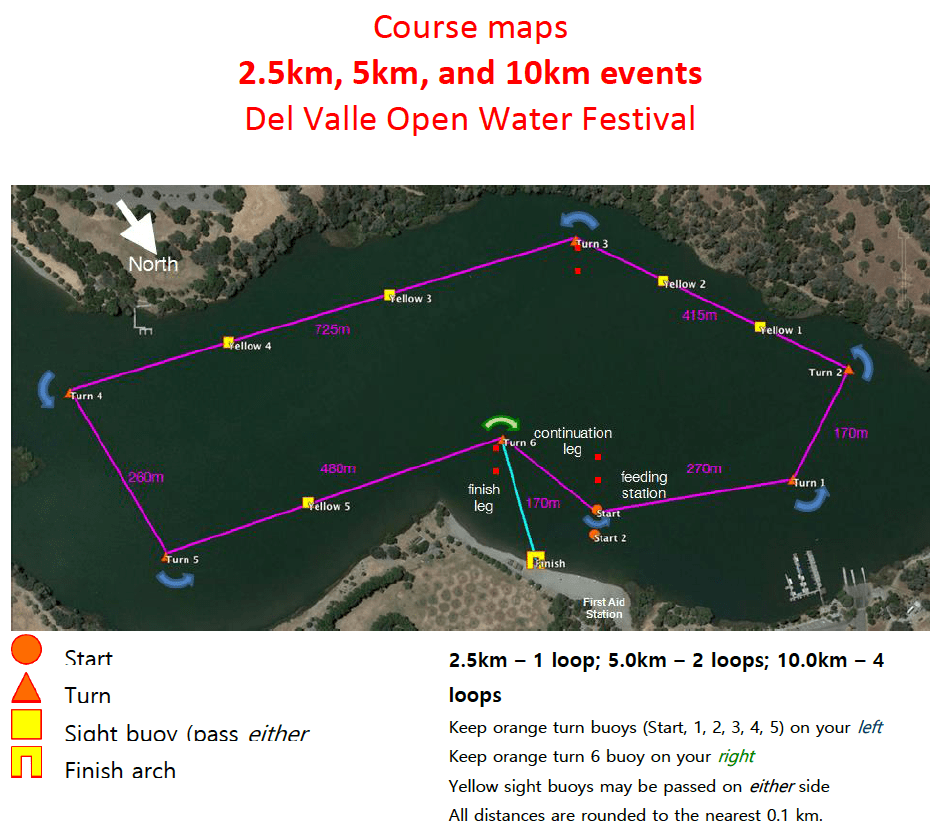
- Finalize a course map (see examples: beach, lake, river, circumnavigation) showing buoy, start and finish locations, safety support (boats/kayaks), medical tent, and anything else important about your course. Make this map available to participants.
- Finalize your safety plan based on feedback from venue officials and your LMSC that outlines locations and duties of lifeguards and course monitors; emergency action plans; access to safety boats and type of boats (powerboats, kayaks, paddleboards); number of buoys on the course; course outline (see example); and EMT and other volunteer locations. See notes and exceptions below:
- All motorized craft operated by volunteers used in USMS-sanctioned open water events MUST have a propeller guard or a dedicated swimmer monitor in the craft to assist the boat operator in watching swimmers.
- Professional organizations such as police, Coast Guard, fire rescue, etc., do not need propeller guards.
- Boats at anchor throughout the duration of the event do not need propeller guards.
- Boats with propellers fore of the rudder (inboard type motors) do not need propeller guards. However, these boats should not run directly on the swim course. For events requiring personal escort craft, watercraft with inboard motors may be allowed on the course provided their engines are off when any swimmer is within 20 feet of the propeller and during relay exchanges. For feedings, the swimmer may approach within 5 feet of the bow or side of the boat with engines engaged.
- Motorized watercraft and/or watercraft operators performing any role in the operation of the event shall produce “proof of insurance.”
- Finalize your communication system used between all safety and event staff (radios, cellphones, flags, horns, etc.).
- Depending on the water temperature and based on USMS water temperature event standards, create a thermal plan, which will be part of your safety plan application. Review your plan with your LMSC and the USMS open water coordinator.
- Identify who will be the event director, safety director, and referee. Get them involved in finalizing the safety and race day plans. NOTE: USMS requires that all safety directors and referees be USMS certified, so make sure they complete the certification process prior to your race day.
- Role of the event director: The event director organizes, manages, and oversees the entire event, except where specific responsibilities are given to other officials under USMS Rules & Administrative Regulations. The event director organizes many of the steps in this guide.
- Role of the safety director: The safety director works with and is responsible to the event director for all aspects of safety and works with the referee, medical staff, safety monitors and crews, escort craft, etc. The safety director can give the pre-race safety briefing and provide any training as needed. NOTE: The safety director’s duties and role cannot be combined with any other duties of any other official or staff member.
- Role of the referee: As the head official, the referee is responsible for the conduct of the swim itself and works with the event director and safety director to plan, conduct, and conclude the event. The referee can brief, position, and supervise race officials, perform pre-race briefings, help manage the swim, keep an eye towards event fairness, work with the timers and recorders, etc. The positions of event director and referee may be combined for small swims (fewer than 100 swimmers) but isn’t recommended for larger swims.
- Create an emergency action plan working with your safety director and referee for the following possibilities:
- Race postponement or cancellation
- Modifying the course
- Unusual conditions, such as the air or water temperature being very hot or very cold
- Tired or distressed swimmers
- Swimmers needed emergency services for heart attack, stroke, seizure, hypothermia, etc., along with minor issues such as cuts and abrasions
- Complete the venue permitting process paperwork and make sure you receive a paper copy of your permit. Place this permit in a working notebook for the event and make sure you have it with you race day.
- Determine how you plan on doing registration. Are you going to use an online registration company like Club Assistant? If so, get started on this ASAP. Work with the registration company to create information for your registration page. your event’s registration page. Make sure to collect all important participant information such as name, address, phone number, birth date, age, emergency contact information, T-shirt size, USMS ID (Club Assistant can automatically verify USMS membership as part of the entry process), etc. Enlist several people to test it multiple times to ensure it’s working correctly.
- Are you going to accept paper registrations? If so, create the entry form collecting all important participant information such as name, address, phone number, birth date, age, emergency contact information, T-shirt size, USMS ID, etc.
- Are you going to create a dedicated race website for your event or do you already have a website to use, such as a swim club’s website? Make sure you provide as much detailed information about the event as you can. Refer to other race websites for examples and ideas on creating your site.
- Whether doing online registration, paper entry forms, or both, make sure that every race participant signs the USMS waiver. The waiver can be downloaded in PDF or Word formats. This is an insurance requirement.
- Complete the USMS sanction safety plan application form using your safety plan, course map, and entry form.
- Complete the USMS online sanction request process, which will require you to upload your safety plan application form, course map, and entry form. Once you submit this online, your LMSC and the USMS open water coordinator will receive it for review.
- Review your application with your LMSC sanctions chair and the USMS open water coordinator and update as needed based on their feedback.
Step 3: Sponsors, Volunteers, Timing, and Running Your Event
- Seek out sponsors for your event and decide how you will involve them in the event. Will sponsors be at the race or provide post-race swag? Will the race sponsor appear in the event title, on the swim cap, or on the website? Work with some local companies on sponsorship. Involving your local businesses can be beneficial to both them and your event. USMS partners may also be able to provide support to your event. Contact partners@usmastersswimming.org for details.
- How will you get the word out about your event? Consider partnering with other events in your area to cross-promote through flyers in goody bags, emails, social media posts, or raffle prizes (free entries or other prizes). Attend other events in your area and visit local Masters clubs to help spread the word.
- Seek out as many volunteers as possible. Decide how you will attract volunteers to give their time to your event. To adequately support an event, there should be volunteers for the following stations: parking, registration, awards, hospitality, set-up and tear-down, communications, course set-up and tear-down, and a timing liaison. Put one person in charge of each volunteer station. Look for volunteers at your local Masters club, through your local schools, through triathlon clubs, other athletic clubs, etc. Make sure you provide your volunteers T-shirts, swag, food, etc., for their time. Use an online company like Sign Up Genius to register your volunteers in each position needed. This is a great way to track the number of people needed and communicate with them.
- Seek out volunteers for safety support (kayakers, paddleboarders, etc.). Make sure that you educate these folks on the difference between a distressed swimmer and a tired swimmer. Make sure they understand their role and what they need to do if they have a distressed swimmer needing assistance. Your safety director can coordinate your safety plan with all members of the safety team out on the water so that everyone knows their role. If possible, mix in trained lifeguards with your volunteer staff and have them spaced appropriately for maximum supervision of your course.
- Determine who will time the event and how it will be timed. This can be a timing company using chip timing or a group of volunteers. Hiring a timing company to take care of athlete tracking and timing is your best bet. The timing company will handle all the important athlete-timing aspects of your event. It is preferable to use chip timing since athlete tracking is much easier and quicker and provides a level of safety. Instructions will be supplied prior to your event so results can be formatted correctly to be included in the USMS open water results database.
- Make sure there is a backup timing method, which can include athlete order at the finish line with times listed when possible.
- In addition to your timing system, create a plan on how you’re going to account for all swimmers going into the water as well as coming out of the water. One way is to create a check-off sheet with each swimmer in numerical order and have them line up in numerical order prior to entering the water. Then check them off one-by-one as they enter the water. Use this list to work with your timing folks to make sure everyone who went into the water comes out.
- What are you going to include in your registration fee—T-shirt, sticker, towel, post-race meal, cap, etc.? Order these items as close to the event as possible while ensuring they will arrive when needed. If possible, seek sponsorship for some of them. You can advertise that these items are free to each registered participant.
- Provide a modest pre- and post-race snack at a minimum along with making sure to have plenty of water. You may want to host a more complete meal for your participants, so plan ahead with any catering, staffing, and set-up you need. Seek donations from local restaurants and stores in exchange for advertising.
- How are you going to handle awards? Are you going to use medals, embroidered towels, mugs, or something that represents the local area? Order these items as close to the race date as possible to help ensure you can order an appropriate amount.
- Are you going to have a mass start with all swimmers or have them start in waves? If waves, determine if your waves will be based on age or speed. If the waves are based on speed, you will need to collect this information during registration. This can be based on mile times or have a “new to open water swimming” wave.
- You will need a different cap color for each wave. Make sure the cap colors are highly visible. Bright colors such as neon green, pink, yellow, or orange work well in most conditions.
- Determine a race day timeline based on the number of open water event distances, number of waves, and time cutoffs. When will registration open and close? Do you have a time frame for event completion that is in the venue permit? It is best to design a timeline that will keep your venue happy and leave room for error.
- Ensure that you will have a sound system for the announcer, music, and awards. Will you use a bullhorn or a microphone? If you use a bullhorn, make sure it has fresh batteries (and backups!).
- Are you allowed to have music at your venue or is there a volume restriction during certain times?
- Make sure that the local businesses around the body of water and local businesses know about your event. They can talk it up! Also, they may volunteer to provide support.
- Make a list of parking, registration, directional, or other event signs you may need.
- Create a registration tub that contains wide tip markers, sunscreen, lots of pens, race-day entries, tape, rulers, and scissors.
- Create another tub that contains zip ties, hammer, headlamps, and other tools.
- What will you serve at your post-race hospitality station? Make sure you have coolers and plenty of ice.
- If your venue does not have tables and chairs, or covered areas, you may need to rent or borrow tents, tables, and chairs for registration, hospitality, or other areas.
- Be organized and plan ahead! Often the small details make a big impression. Create a detailed schedule and follow it.
Step 4: Final Preparations
- Make sure that awards, swag, T-shirts, or other ordered race items arrived. Organize your awards and athlete check-in items so that race-day registration is smooth.
- Have a meeting with your lead volunteers who oversee each station and make sure each station is covered with the proper number of volunteers and each station knows what it’s doing. For example, make sure the course set-up crew understands how to set up buoys and the finish line. Go over the race-day timeline and responsibilities.
- Direct the lead volunteers to contact the volunteers in their group to make sure they know the times they’re needed, where to go when they arrive, and role/responsibilities.
- Finalize all permitting and insurance requirements and make the payments needed with the local permitting office. Make sure you have completed everything with your local governing bodies that permitted the event. Make sure you get your final and approved permit and have it with you on race day.
- Make sure the parking plan is set with the local city/county and you have volunteers to help with the parking.
- The event director and safety director should collaborate to write a pre-race safety meeting speech. Print it out so that you have a copy to read from at the event. Share important details in your pre-race communications.
- Print a few large course maps to hang at registration and at the pre-race and safety briefings. The safety meeting course map should include lifeguard and course monitor positions among other safety details.
- Organize a meeting with police, safety boaters, and shore personnel prior to the event to make sure everyone is on the same page about how the event is going to be run and that all people understand their roles and responsibilities. Review your entire plan.
- Communicate with the professional safety personnel (including EMS) who will be on-site for your event and make sure they understand your event so that they bring the appropriate equipment and have it on-site.
- Note that:
- Course monitors watch swimmers
- Rescuers watch course monitors
- Medical staff watch rescuers
- The safety director watches everybody
- Swimmers take a large degree of responsibility for themselves, such as knowing their own abilities, training appropriately, following the event’s rules and safety guidelines, knowing when to continue and when to stop, knowing and understanding their own health conditions, having a race/swim plan in place and following their plan, etc.
Step 5: Race Day
- Always arrive early on race day. Help lead volunteers for course set-up and registration. Try to answer questions and solve race day problems that may arise.
- The race day timeline should be posted next to the course map at registration and at the pre-race briefing.
- Make sure the announcer is communicating with the athletes and directing them. The announcer should have a course map and a timeline.
- It is especially important to stay on time with your published timeline.
- Make sure the check-in area is clearly marked and ready for when athletes arrive.
- Place the body marking area in a highly visible area. Make announcements that body marking is required. Body marking can be on calf, arm, and/or back. If wetsuits are worn, mark the back of the swimmer’s hand. Mark the swimmer’s caps prior to distributing them, but also have extras on hand in case a cap breaks.
- Make sure the timing company has everything it needs. The timing company should have a copy of the race day timeline. Keep in frequent contact with the timing personnel. The timing company will need to know how to document DNFs and missing swimmers and how to format results so they can be uploaded to the USMS open water results database.
- Conduct the pre-race meeting! Don’t skip on information here. Be creative and fun, but make sure athletes understand expectations. Here are some guidelines to topics for your pre-race meeting:
- Event procedures such as waves
- Swimmer’s responsibilities
- Course explanation and directions
- Safety personnel on course
- Buoy turns
- Starting and finishing
- Dropping out of the swim
- Evacuation procedures
- Time cutoffs
- Award ceremony
- Post-race food and festivities
- Start the race on time unless it is out of your control (e.g., weather related). Athletes tend to remember if the event was organized, and timeliness is a big part of that image.
- Make sure that you have enough volunteers to monitor the event safely. Have floater volunteers on hand to fill gaps for no-shows or if extra help is needed in certain areas.
- The timing company should be posting results as athletes finish. Make sure it can produce results within minutes after the last finisher. Live results posting to the web is the best way to get the results to your athletes. Posting paper results is good too but not always ideal. The timing tent may be a distance from a posting location or the ground is not suitable for posting results where athletes with no shoes will want to stand.
- Have the post-race food and/or party staged in advance so swimmers can enjoy it once they finish the race.
- Have fun on race day!
Step 6: Post-Race Tasks
- Final results should be posted to the web as soon as possible. Sometimes people leave an event after they finish and don’t look at the results until later. There may be a few corrections needed after the event. The timing company should help you with that.
- Have the timing company send you results in the proper format to be uploaded to the USMS open water results database.
- Thank all sponsors and volunteers by sending personalized letters, emails, and/or throw a volunteer party.
- Follow up with your volunteers and USMS officials to get feedback regarding the event. Choose the best ideas moving forward.
- Get feedback from all lead volunteers from each station. Have them write down what they noticed could improve for next year or ideas to make the event better.
- Be creative for looking forward to a new year ahead. For example, include a wave for new open water swimmers or present embroidered towels to the top men and women. Because some swimmers are intimidated by open water swimming, create a fun wave that allows swimmers to wear fins or a pull buoy or use a snorkel or a kickboard. Be sure that everyone can swim in the fun wave.
The ride will seem crazy, but enjoy it and the new friends that you make along the way!